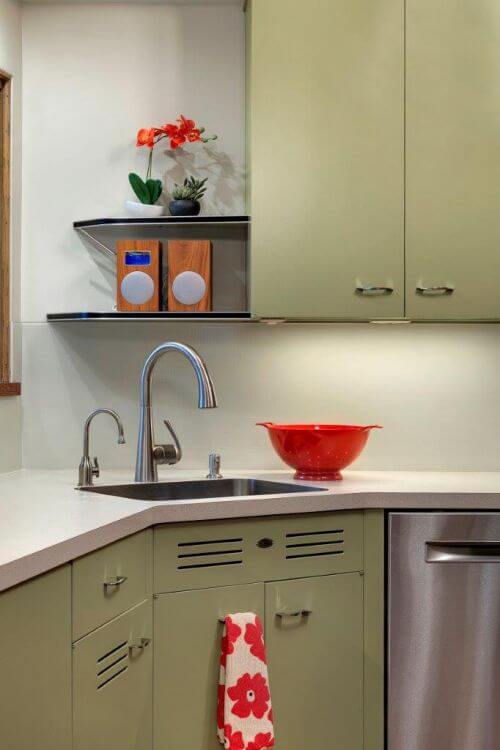
Photo courtesy of Che Bella Interiors and Spacecrafting.
If you have a midcentury modern style kitchen — and want to keep the kitchen backsplash as simple, yet functional, as possible, check out this super ingenious idea from Roger and Lynsey. Their “barely there” solution: Long runs of textured glass, back-painted to match their laminate countertop.
Photo viewing tip: If you are on a desktop computer, click on the photo, and it should enlarge up to double in size on your screen, so that you can see more detail.
We wrote about Roger and Lynsey’s project to remodel their 1953 kitchen yesterday. Oh my: Those delicious St. Charles kitchen cabinets! Steel kitchen cabinets don’t get any better than these cabinets!
To complete their decisively midcentury modern look, Roger and Lynsey wanted a backsplash with just the right measure of minimalist style.
Lynsey wrote:
We wanted something very clean looking, so we decided on solid sheets of glass with a small dotted pattern. (You can see the dots just ever so slightly in a few of the photographs.) The back of the glass was painted to match the walls, so in a way it looks like we don’t even have a backsplash.
Alas, the project came with a hitch: The couple went through TWO backsplashes to get everything right.
What happened?
Yes, we put the textured side against the wall. The reason we did this is because when the textured side was out, it felt neat to the touch … BUT it gave off this crazy hologram effect. You remember those little holograms you used to get in a Cracker Jack box? Well, that’s what the backsplash looked like when the textured side was on the outside.
And how do I know this? Because of the “first” backsplash. The contractor painted the wrong side and put the textured side out! (We actually specified it correctly since we were aware of the hologram effect from the sample … but then, I suppose, the contractor was like, “Who are these crazy people wanting to paint the wrong side?”) I walked into the kitchen halfway through the installation and thought I was going to have a seizure the hologram effect was so crazy! It was adhered using some kind of epoxy … quick setting, but not so quick that they couldn’t remove the first backsplash.
 The product they used, screen shot from their website, above:
Here’s the glass we used: SGG Master-Carre Glass from Torstenson Glass Co.
Paint color on the back of the glass? Lynsey responded:
The paint color was the same as the kitchen walls — Sherwin-Williams Wool Skein.

In the bullet below, Lynsey explains how she had to finagle where the glass backsplash met the window.
Other challenges:
-
Overall length — The backsplash length was longer than the available length of glass. So, we had to use a few pieces, which created seams … and which wouldn’t have been a big deal, but we had to make sure the “dots” lined up so the rows looked straight. Roger added: If I recall correctly the longest piece of glass they could get was 120″, which is why there is the one seam on the left.
-
Un-level countertops — So, as you know with old homes, nothing is quite level … and our countertops (even though new) were still a bit un-level — not enough that things were rolling around on them, but enough that we had to cut the glass a bit “crooked” so that the dots would be parallel with the countertops.
-
Filling the gaps around the windows — Again, given the nature of the old house, the way the cabinets were installed, and the way the plaster “curves” around the window, the backsplash was a bit too long, leaving a gap behind it. We had to create L-shaped pieces to fill the gaps where light from the window was shining through the glass and casting shadows on the countertop. See last photo where everything comes together at the window. (PLEASE ignore the dirty window screens — ha!)
Finally, re installation, Roger recommends working with pros — and this sure sounds like the smart answer to me, too:
I would definitely consider this something you want to hire a professional for. Between cutting the glass to size, painting the back and installing, it’s a bit complicated. The glass is also tempered, so that it was strong enough to carry in the house for the installation.
Very nice, Lynsey and Roger!
The post Midcentury modern kitchen backsplash idea: Back-painted textured glass appeared first on Retro Renovation.

